
At its heart, a boom arm is the bit that lets you place a microphone with real precision, far beyond what you could ever manage with a simple straight stand. It’s the absolute workhorse of any professional audio setup, letting engineers get mics perfectly over a drum kit, in front of a singer, or suspended above an acoustic guitar.
Why a Professional Boom Stand Is Non-Negotiable
Picture a standard mic stand as a fixed lamppost. It's solid, but it only lights up the spot directly underneath it. A boom stand, on the other hand, is more like an articulated desk lamp. It gives you the same solid base but adds an adjustable arm that can reach over, under, and around whatever's in the way. That one simple addition changes the whole game.
For anyone working in studios, on stages, or in broadcast, this flexibility isn't just a nice-to-have—it's essential. It means you can hang a delicate condenser mic over a drum kit's cymbals without the stand’s base getting tangled up in the hardware, or get a vocal mic just right for a seated acoustic guitarist. The boom arm, perfectly balanced by its counterweight, delivers both that extra reach and rock-solid stability.
This guide is built for audio pros who need kit they can rely on. We'll walk through everything you need to know about professional boom stands, covering:
- Anatomy and Types: We’ll break down all the components and look at the different designs out there, from your classic tripod booms to the heavy-duty beasts you find in top-end studios.
- Key Specifications: Getting to grips with the critical numbers—height, boom length, and load capacity—so you can make smart buying decisions.
- Fit-for-Purpose Selection: Practical checklists to help you choose the right stand whether it's for the studio, live stage, broadcast, or a permanent installation.
- Setup and Safety: Mastering proper balancing, positioning, and cable management to keep your setup safe and your sound clean.
By the end of this, you’ll have all the know-how needed to pick, specify, and set up the perfect boom stand for any audio challenge you face, making sure every single microphone is exactly where it needs to be.
Deconstructing The Boom Stand Anatomy And Types
To pick the right tool for the job, you first need to know what you’re working with. A professional boom mic stand might look simple, but every single component is there for a reason—engineered to solve a specific problem, from rock-solid stability to getting that microphone exactly where you need it.
Think of it like a human arm. The base is the shoulder, providing a stable anchor. The vertical main mast is the upper arm, the adjustable clutch acts as the elbow, and the boom arm is the forearm, reaching out to place the microphone (your hand) with precision. It’s a simple analogy, but it makes the mechanics instantly click.
The Core Components Of A Boom Stand
Every part of a boom stand works together to give you the stability, reach, and fine control needed for professional audio work.
- The Base: This is your foundation. Tripod bases are the go-to for stability, spreading the weight across three points, which makes them perfect for uneven surfaces. On the other hand, a heavy round base has a much smaller footprint, making it the ideal choice for a tight stage or a cramped broadcast booth where you can’t afford to have people tripping over legs.
- The Main Mast: The vertical pole that sets the stand's general height. Nearly all are adjustable via a clutch, letting you get the rough height sorted before you even touch the boom.
- The Boom Arm: This is the horizontal pole that gives you that all-important reach. It’s the defining feature of a mic stands boom, allowing you to position a mic far away from the main mast, over a drum kit, or in front of a singer sat at a piano.
- The Clutch: This is the joint where the boom arm meets the mast, and frankly, it's the most critical part. It controls both the angle and rotation of the boom. For any professional use, a high-quality, durable clutch is completely non-negotiable.
- The Counterweight: A heavy block, either fixed or sliding, at the far end of the boom arm. It’s there to balance out the weight of your microphone and stop the whole thing from tipping over. When it's balanced correctly, the stand should hold its position without you having to crank the clutch down excessively.
This infographic neatly shows the key benefits you get when all these parts work in harmony.
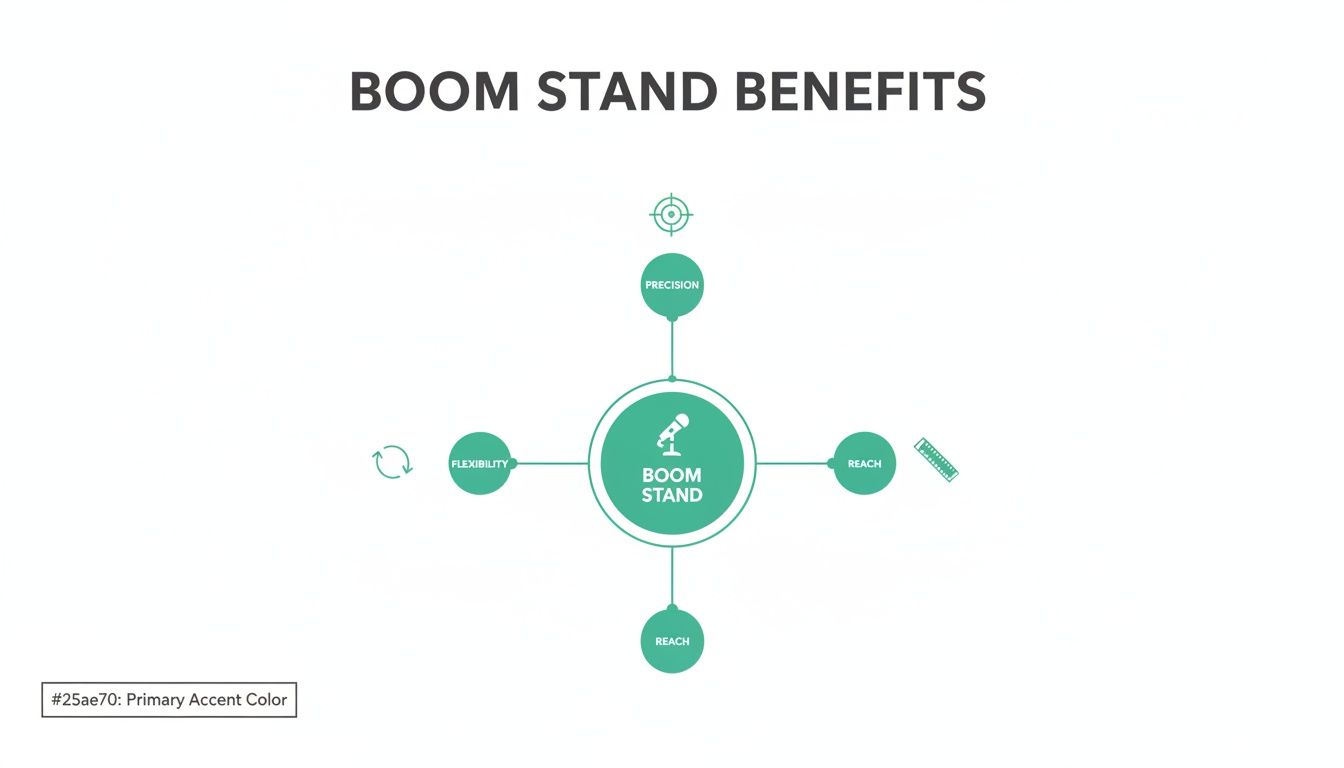
It’s all about flexibility, precision, and reach—three things every audio pro relies on.
Common Types Of Boom Stands
While they share the same basic anatomy, boom stands come in several flavours, each dialled in for specific situations. Knowing the difference is just as important as knowing the parts. The demand for specialised mic supports has exploded thanks to everything from the podcast boom to upgrades in AV for hybrid working, cementing the market for these distinct designs.
A boom stand isn’t just a piece of metal; it's a problem-solver. The question is never "which stand is the best?" It should always be "which stand is the best for this job?"
Here are the main types you’ll come across:
-
Tripod Boom Stands: The absolute workhorse. You'll find these in pretty much every studio and on every stage. With adjustable legs and a versatile boom arm, they can handle almost anything you throw at them, from micing a vocalist to an acoustic guitar. Their footprint can be a bit big, but the stability is second to none.
-
Round Base Boom Stands: When floor space is tight, this is your hero. The heavy, compact base is perfect for a lead singer on a cluttered stage or for squeezing into a small podcasting setup. It trades the all-terrain stability of a tripod for a minimal footprint.
-
Low-Profile Boom Stands: These are essentially short stands with a short boom arm, built specifically to get close to the floor. They are indispensable for micing up kick drums, guitar cabs, or any other sound source that’s low to the ground, all without a massive stand getting in the way of the shot or the performance.
-
Overhead & Studio Boom Stands: The heavyweights. These are the giants of the stand world, built with incredibly long boom arms, hefty counterweights, and often mounted on wheels. They’re designed to suspend heavy condenser mics high over a source, like a drum kit or a choir. These same principles of secure, elevated placement are crucial in other areas, too; have a look at our guide on speaker stands for surround sound to see how it applies elsewhere.
Understanding Key Specifications for Procurement

When you’re sourcing gear for a professional project, getting bogged down in brand names is a rookie mistake. The real story is always in the technical specifications. Those numbers on the spec sheet aren’t just filler; they’re the blueprint for a stand's performance, stability, and whether it’s genuinely right for the job. Getting this right from the start means you can place precise procurement orders and dodge those costly, frustrating mismatches between the gear and the gig.
Think of it like ordering a crane for a building site. You wouldn't just ask for "a crane." You’d need to know its maximum reach, how much it can lift, and what it’s made of. It’s the exact same logic here. You need to be certain the stand can do its job safely and effectively.
This shift towards quality and precision is something we're seeing across the wider market. While the total number of mics and stands sold in the UK has fluctuated, the market's overall value is climbing. Recent data shows that even as unit consumption dipped to around 4.8 million units, the market value actually grew by 5.4% to approximately $192 million. It’s a clear sign that pros are investing in better, more reliable kit. You can dive deeper into the UK market dynamics for microphone accessories to see how procurement trends are evolving.
Core Metrics: Height and Reach
Let's start with the basics. The two most fundamental specs you need to check are the stand's vertical height and the boom arm's length. These figures tell you exactly what physical space the stand can operate in.
-
Maximum Height: This is how high the main mast can go, measured from the floor right up to the clutch. If you're micing drum overheads or a standing choir, a tall stand is absolutely non-negotiable.
-
Boom Arm Length: This dictates your horizontal reach. A long boom is a must-have for getting a mic over a grand piano or reaching the centre of a big boardroom table from the edge of the room.
Remember to think about how these two specs work together. A really tall stand with a stubby little boom might not be able to get the mic where you need it. On the other hand, a long boom on a shorter stand is perfect for sources closer to the ground, like a kick drum or a guitar amp.
The Critical Role of Load Capacity
This one is arguably the most important spec for both safety and performance: load capacity. This number, usually given in kilograms, tells you the maximum weight the boom can handle at full extension without drooping, slipping, or tipping over.
Ignoring this is asking for trouble. If you mount a heavy vintage tube mic—which can easily top a kilogram—on a stand built for a lightweight dynamic mic, you’re risking a slow, take-ruining sag. Worse, the whole thing could topple over.
When you're looking at load capacity, always give yourself a safety buffer. If your mic and shock mount weigh a combined 1.5 kg, look for a stand rated for at least 2 kg, maybe more. This is especially true if you plan on using the boom at its full extension.
Navigating Thread Sizes and Materials
Finally, let’s talk about compatibility and construction. These details are what ensure your new stands work with your existing gear and can handle the rough and tumble of professional life.
Thread Sizing:
The thread at the end of the boom is where your mic clip or shock mount attaches. There are two main standards you'll see:
- 5/8"-27 TPI: The standard across the UK and North America.
- 3/8"-16 TPI: The standard used throughout Europe.
The good news is that most professional stands today ship with a 5/8" thread and include a simple screw-on adaptor to convert it to 3/8". This gives you universal compatibility out of the box, but it's a tiny detail that's essential to confirm before you place a big order.
Material Composition:
What the stand is made of directly impacts its stability and portability.
- Steel: This is the workhorse. It’s tough, durable, and its weight adds to the stand’s stability by keeping the centre of gravity low. All at a pretty reasonable cost.
- Aluminium: Much lighter than steel, making it the go-to for portable rigs where you're constantly loading in and out. The trade-off is that it might not take as many heavy knocks.
- Composites: Some higher-end stands use high-density plastics or even carbon fibre for parts of the construction. This can cut down on weight without sacrificing rigidity, but you’ll usually pay a premium for it.
Choosing the Right Boom Stand for the Job
Knowing the specs is one thing, but applying that knowledge in the real world is where it really counts. The perfect boom stand for a live stage vocalist would be a terrible choice for micing up a drum kit in a studio. It’s all about matching the tool to the task, focusing on the features that solve the unique challenges of each environment.
This problem-solution approach means you’re not just buying a piece of hardware; you're investing in a reliable solution that won't let you down. Let's break down the most common professional applications and pinpoint the ideal boom stand for each one.
The Recording Studio Environment
The studio is a controlled space where audio quality is everything. Precision, stability, and acoustic isolation are far more important than how quickly you can pack it away. Here, the right boom stand is often the unsung hero of a great recording.
- Vocal Booths: A sturdy tripod or round base boom stand is your best bet. The priorities are a small footprint to fit inside the booth and a solid clutch that won't let a heavy condenser mic droop mid-take. You don't need a massive boom length here.
- Drum Overheads: This is a job for a heavy-duty overhead boom stand, no question. You need maximum height to get above the kit and a long boom arm to position a matched pair of mics perfectly over the cymbals. A heavy counterweight and a wide, stable base—often on wheels for easy adjustments—are absolutely essential for both safety and performance.
- Acoustic Instruments: For a seated guitarist or a cellist, a standard tripod boom stand offers fantastic versatility. You need just enough reach to get the mic into the sweet spot without the stand's base getting in the performer's way. An easily adjustable, reliable clutch is key for making those subtle positioning changes on the fly.
Live Stage and Performance Venues
On stage, durability and practicality rule. Gear needs to be set up and torn down fast, withstand the inevitable knocks, and have a footprint that doesn't create a trip hazard for performers.
For live sound, a boom stand must be a dependable workhorse. It needs to hold its position through a three-hour set, shrug off being knocked by a guitarist, and pack down easily at the end of the night. Reliability is the name of the game.
For both vocalists and instrument amps, the classic tripod boom stand is the industry standard for a reason. Its stability is vital for a dynamic vocalist, and its adjustable boom is perfect for a singer-songwriter with an instrument. When it comes to micing guitar cabs, a low-profile boom stand is really the only way to go, allowing you to get a mic right on the speaker cone without a tall mast in the way.
Broadcast, Podcasting, and Content Creation
In broadcast and podcasting studios, the visual element is often just as important as the audio. Stands need to be functional and unobtrusive, and they’re often designed for a desktop environment. When choosing your stand, it's vital to see how it fits into the bigger picture; for those just starting out, guides on building a reliable streaming setup can provide some valuable context.
- Radio and Podcasting: Desktop-mounted boom arms—those scissor-style arms you see in radio studios—are ideal. They clamp directly to the desk, offer smooth and silent repositioning, and keep cables tidy and out of sight.
- Television and Streaming: A combination of low-profile stands for hidden mics and desk-mounted booms for on-camera talent usually works best. The goal is to maintain clean sightlines and a professional appearance. For instance, the Konig & Meyer KM-12190 is a broadcast-style desk stand that combines sleek design with robust functionality, making it a popular choice in professional streaming circles.
Permanent Installations and Conferencing
For installations in lecture halls, houses of worship, or conference centres, the focus shifts to long-term reliability and a clean, integrated look.
A short boom stand with a heavy round base is the perfect solution for podiums and lecterns. Its small footprint fits neatly beside a lectern, while the short boom provides just enough reach to position a microphone for the speaker without obscuring their face.
In boardrooms, a few well-placed tall stands with long boom arms can cover multiple speakers, reducing the need for individual microphones and simplifying the entire setup. Here, it’s all about reach and stability.
Mastering Setup, Positioning and Safety
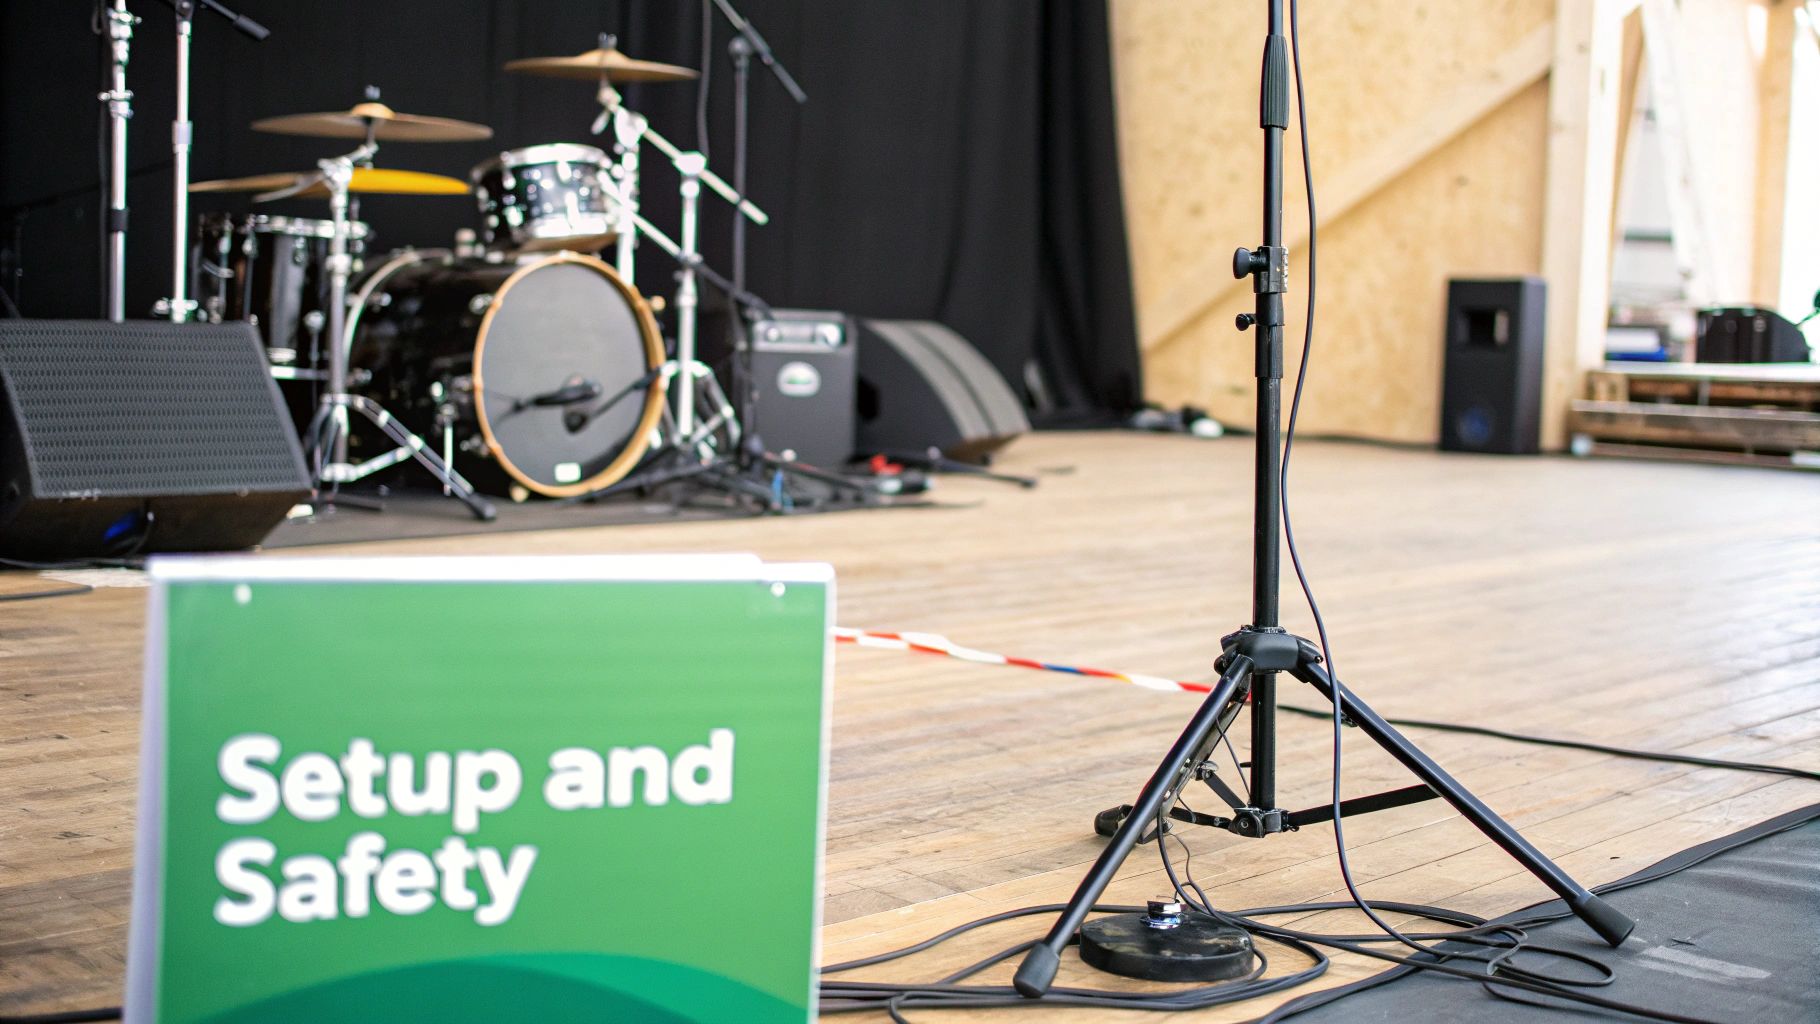
Owning a professional boom stand is only half the battle; knowing how to set it up properly is what separates the pros from the amateurs. A badly configured stand isn't just a risk to your recording—it's a genuine safety hazard. Getting to grips with the principles of balance, positioning, and on-site common sense is key to keeping your gear, talent, and projects secure.
Think of balancing your mic stands boom like a seesaw. That expensive microphone on one end needs to be perfectly offset by the counterweight on the other. It’s a game of physics, not brute force. Simply cranking the clutch tight to hold an unbalanced, heavy mic is a surefire way to cause premature wear and, eventually, a sudden, disastrous collapse.
Getting the balance right is straightforward. First, extend the boom arm to the length you need with the mic already attached. Now, slide the counterweight back and forth until the arm stays level all by itself, even with the clutch loose. It should just ‘float’ there. Only then should you tighten the clutch to lock in the final angle.
Achieving Stability Through Leg Placement
For the classic tripod base, stability is all in the legs. A rookie mistake is to just splay the legs out any old way, but there’s a proper technique that massively reduces the risk of the whole thing toppling over, especially with a long boom.
Always position the stand so that one of the three legs points directly in the same direction as the boom arm. This simple trick keeps the stand’s centre of gravity safely inside its widest support area. It’s a small detail that makes a world of difference when a performer accidentally knocks the stand or when you’re using a heavy mic at full stretch.
A well-balanced boom arm, paired with smart leg placement, creates an inherently stable system. It shouldn't feel forced into position; it should want to stay put. This is the foundation of any professional, safe setup.
Positioning and Cable Management Best Practices
With the stand safely balanced, it’s time for precise mic placement and tidy cable management. The aim is to get the best possible sound without creating a mess of trip hazards – an essential skill in any busy studio or crowded stage.
Good placement gets the mic into the sweet spot relative to the sound source, while keeping the stand's base and mast out of everyone’s way. Of course, a solid setup isn’t just about stability; it's also crucial for sound quality. To dive deeper, you can learn how to reduce background noise in your microphone by optimising both your gear and recording space.
Follow these steps for a clean, safe, and professional setup:
- Run Cables Securely: If your stand has built-in clips, use them. If not, a few reusable velcro ties are your best friend. Run the mic cable neatly along the boom and down the main mast.
- Create a Service Loop: Always leave a small, loose loop of cable right by the microphone clip. This little bit of slack stops any tension from yanking directly on the mic’s connector if the cable gets snagged.
- Tape Down Floor Cables: In any high-traffic area—like a live stage or a busy studio walkway—always use gaffer tape to secure cables to the floor. This is non-negotiable for preventing trips and falls.
A tidy setup is a safe setup. It doesn't just look the part; it minimises the risk of accidents that could damage expensive equipment or, worse, injure someone. For more complex rigs, knowing how all the parts work together is vital. For instance, you can check out our guide on pairing wireless microphones with speakers to see how these principles apply to a complete system.
Keeping Your Gear in Check: Maintenance, Fixes, and Procurement
Even the toughest professional boom mic stand needs a bit of attention to keep it performing safely and reliably year after year. Skipping basic maintenance is a false economy; it just leads to early wear and tear on crucial parts and could even put your expensive microphones at risk. Being proactive with a little upkeep not only makes your gear last longer but saves you from a disastrous failure during a critical recording session or live show.
Think of it like the routine checks you'd do on any important tool. A simple maintenance schedule, focusing on the bits that get the most stress and movement, can make a world of difference. This isn't about getting an engineering degree; it’s just about being consistent and paying attention.
A Simple Maintenance Checklist
Keeping your stands in top condition is pretty straightforward. A quick once-over before and after big projects can catch small issues before they snowball into real problems.
- Clean the Threads: Give the threads on the boom arm and any adaptors a regular wipe. Grit and grime build up and can strip the threads over time, making it impossible to get a mic clip to hold tight.
- Inspect and Lubricate: Check all the moving parts, especially the height adjustment clutch and the boom pivot. A tiny dab of light machine oil or silicone lubricant will keep them moving smoothly and stop them from seizing up.
- Check Locking Mechanisms: Make sure all the clutches and locking screws tighten up properly. If a clutch slips no matter how hard you crank it, the friction discs inside are probably worn out and need replacing.
- Base and Leg Inspection: For tripod stands, check that the legs open and lock securely. On round base stands, give the main pole a wiggle to make sure it's still tight where it meets the base.
Solving Common Boom Stand Problems
Even with the best maintenance, things can go wrong out in the field. Here’s a quick guide to troubleshooting the usual headaches:
| Problem | Likely Cause | Solution |
|---|---|---|
| Drooping Boom Arm | Worn clutch, unbalanced load, or exceeding load capacity. | First, check the mic is properly counterbalanced. If it still droops, have a look at the clutch's friction pads for wear. |
| Wobbly Base | Loose connection between the mast and base or an uneven surface. | Tighten the locking screw at the bottom of the mast. For tripods, ensure the legs are fully out and locked. |
| Stripped Threads | Cross-threading or dirt build-up. | You might be able to save them with a thread-cleaning tap. If they're beyond help, you'll probably need a new boom arm. |
Professional Procurement Template
When you're buying gear for a project, clear paperwork is everything. This is especially true in the booming UK conference AV market, where there's huge investment in retrofitting rooms with proper microphone setups. In fact, market analysts reckon the UK's conference-microphone sector will grow at a CAGR of around 12.6% over the next ten years, which means demand for high-quality stands and booms is only going up. You can read more on the UK conference microphone market and its growth here.
To make buying simple, a clear spec sheet cuts out any confusion and guarantees you get exactly what you need. It turns your project requirements into a language that purchasing teams and suppliers understand immediately.
Feel free to use the template below for your next project quote or equipment request.
Mic Stand Specification Template
- Project Name:
- Required by Date:
- Quantity Needed:
- Stand Type: (e.g., Tripod Boom, Round Base Boom, Low-Profile)
- Min/Max Height Range:
- Required Boom Length:
- Minimum Load Capacity (kg):
- Base Type: (Tripod / Round / Wheeled)
- Material: (Steel / Aluminium)
- Required Accessories: (e.g., Thread Adaptor, Cable Clips)
- Notes: (e.g., Must fit within a specific footprint)
Frequently Asked Questions About Boom Mic Stands
Even the pros run into a snag or two when it comes to the finer points of rigging and balancing. We’ve pulled together some of the most common questions we hear on the job, with clear answers to help you iron out any issues and dial in your setup.
Balancing and Stability
How do I correctly balance a heavy microphone on a long boom arm?
Think of it as a game of leverage, not just brute force on the clutch. Start by extending the boom arm to the length you need, then slide the counterweight all the way to the back, as far from the pivot point as you can get it.
If the arm is still dipping, you’re either looking at a stand that’s not up to the task or you need to add an extra counterweight. Crucially, always—and I mean always—point one leg of the tripod base directly under the boom arm. This simple trick aligns the whole setup’s centre of gravity over its most stable point and drastically cuts the risk of it toppling over.
Why is a round base stand sometimes preferred over a tripod stand?
It really comes down to footprint. A round base stand takes up far less floor space than a tripod, which makes it the go-to choice for tight spots. You’ll see them all over cramped stages, tucked into small broadcast booths, or used by vocalists who need to get right up to the mic without tripping over a tripod leg.
The solid, heavy base gives them fantastic stability on a flat surface. That said, tripods still have the edge on uneven ground and are much better suited for long boom extensions with heavy mics—their wider stance is just a more robust defence against gravity.
Understanding Boom Arm Types
What is the difference between a telescopic and a fixed-length boom?
A telescopic boom is built from two or more sections that slide inside each other, letting you fine-tune its length. This design is all about flexibility, making it a perfect fit for versatile studio work or tricky live sound situations where you need precise positioning.
A fixed-length boom is exactly what it sounds like: a single, non-adjustable arm. They're often simpler and more rigid, which can be a real advantage for consistent setups where the distance to the source is always the same—think a podium mic or a permanently placed guitar amp mic.
Versatility and Accessories
Can I attach accessories other than a microphone to a boom stand?
Yes, absolutely. Professional boom stands are workhorses. With the right thread adaptors, you can mount all sorts of gear—pop filters, reflection shields, phone holders for lyrics or notes, small cameras, and even portable lights.
Just remember to respect the stand's maximum load capacity. Some accessories, like a big reflection shield, can be deceptively heavy. If you’re mounting something hefty, you need an equally sturdy stand with a proper counterweight to keep the whole rig stable and, more importantly, safe for everyone around it.
At Epic Audio Ltd, we supply the robust and reliable hardware that audio professionals across the UK depend on. From heavy-duty studio stands to portable stage solutions, we provide the backbone for your projects. Explore our extensive range of professional audio equipment and access exclusive trade pricing by visiting us at https://epicaudio.co.uk.