
Picture a microphone with laser-like focus. That's the essence of the hypercardioid polar pattern. It’s a highly directional design that excels at capturing whatever is directly in front of it while aggressively shutting out noise from the sides. This makes it a go-to for isolating specific audio sources, even in the most chaotic environments.
Unpacking the Hypercardioid Polar Pattern
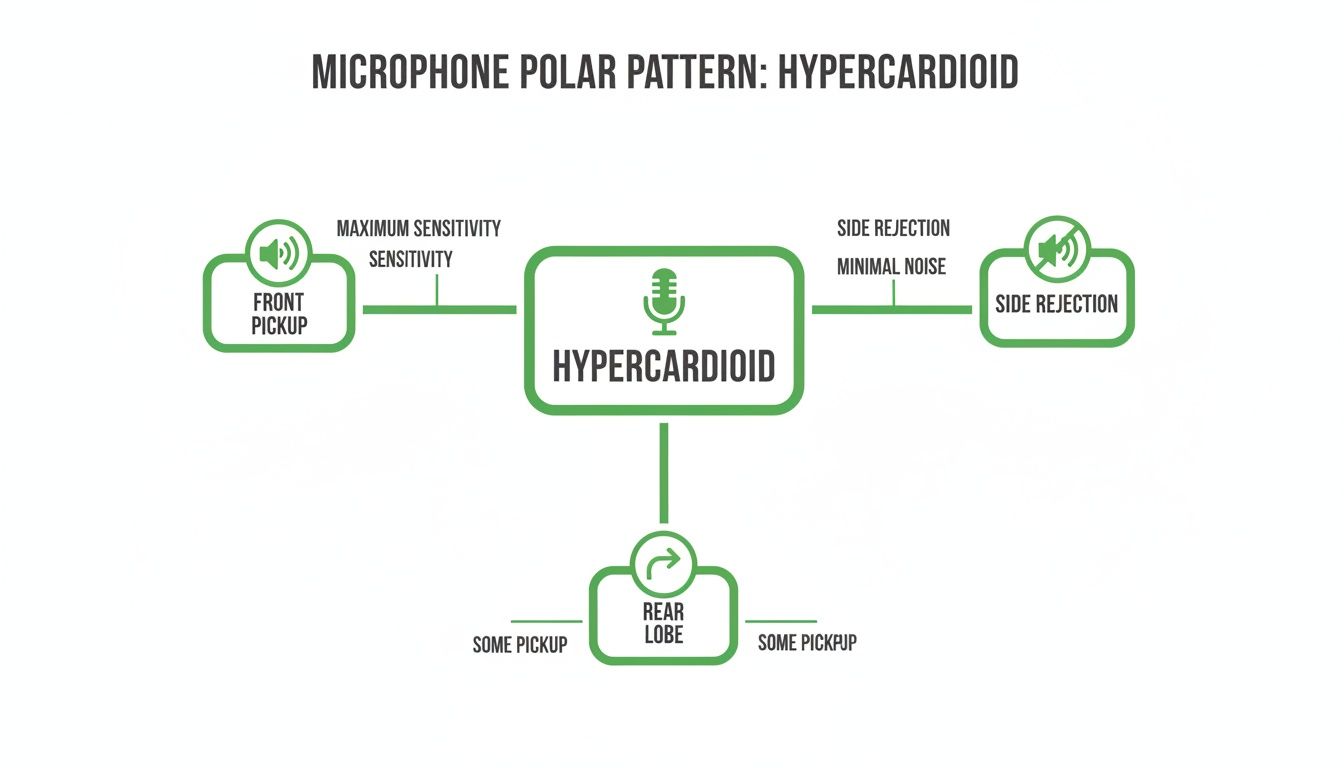
At its heart, a microphone’s polar pattern is simply a map showing how sensitive it is to sound arriving from different directions. Some mics are built to hear everything equally, but the hypercardioid is engineered for pure precision. Think of it like the difference between a floodlight and a spotlight; where other patterns wash a wide area with light, the hypercardioid hones in on a single, tight spot.
This incredible focus is all down to some clever acoustic engineering. The microphone capsule is designed to cancel out sound waves that hit it from the sides, creating dead zones known as "nulls" — points of maximum rejection. For a true hypercardioid, you'll find these nulls at approximately 110 and 250 degrees off-axis.
The Trade-off: A Lobe of Rear Sensitivity
But this tight frontal focus comes with a peculiar quirk: a small lobe of sensitivity directly behind the microphone. This is a critical detail to get your head around. While the sides are almost completely deaf, the mic will actually pick up a little bit of sound from its rear. This isn't a design flaw; it's just a physical consequence of achieving such extreme side rejection.
Understanding this behaviour is the key to using a hypercardioid mic properly. Smart placement is everything. You need to make sure this rear lobe isn't pointing at something you don't want to hear, like a noisy monitor wedge or a chattering audience.
Statistical analysis from UK pro audio rentals reveals that hypercardioid mics are now used in 28% of stage vocal applications in London venues, specifically chosen for their tight 105-degree pickup angle. Their use is linked to a 15% drop in reported feedback incidents at major venues, which is a real testament to their superior isolation.
This high degree of isolation gives you immense control. It’s what allows an engineer to get a crystal-clear vocal from a singer on a deafeningly loud stage, or to isolate a single snare drum in a tightly packed kit. For anyone trying to find clarity in the middle of acoustic chaos, the hypercardioid pattern is an incredibly powerful tool. This focus is especially useful when pairing a directional mic with a PA, a topic we dive into in our guide to using wireless microphones with speakers.
Hypercardioid vs Other Microphone Patterns
Picking the right microphone is all about matching its polar pattern to the specific audio challenge you're facing. While the hypercardioid brings incredible focus to the table, understanding how it stacks up against other common patterns is the key to knowing when to actually use it. Each pattern behaves differently, offering a unique balance between picking up what you want and rejecting what you don't.
Think of it this way: if an omnidirectional mic is a lantern casting an even 360-degree circle of light and capturing everything, then a cardioid is a general-purpose spotlight, focusing light forward while dimming it at the sides and back. The supercardioid is a tighter spotlight, and the hypercardioid is the sniper's laser sight—unmatched in its precision but demanding careful aim.
This diagram shows you exactly what we mean, highlighting the hypercardioid's tight forward pickup and powerful side rejection.
You can clearly see how the pattern’s design creates deep "null" points at the sides—that’s the secret to its exceptional isolation.
Head-to-Head: The Most Common Patterns
Let's break down the practical differences. The most significant distinctions are found in three areas: the width of the front pickup angle, the location of the deepest null points (maximum rejection), and the sensitivity of that little lobe at the back. These factors dictate everything from mic placement to feedback control.
The cardioid pattern, the real workhorse of live sound, offers a forgivingly wide pickup angle. This makes it ideal for vocalists who move around a bit. But that wider acceptance angle means it's more likely to pick up bleed from nearby instruments or stage noise.
A supercardioid pattern tightens that focus, giving you better side rejection than a cardioid. It's a fantastic middle ground, offering more isolation without being as demanding as a hypercardioid. Crucially, its rear lobe is smaller and less sensitive than a hypercardioid's.
The real trade-off becomes clear when you look at the null points. A cardioid's null is directly at the rear (180 degrees), which makes placing a wedge monitor dead simple. Supercardioid and hypercardioid patterns shift these nulls to the sides, demanding much more precise positioning to avoid feedback.
This precision was a game-changer in live sound history. During the massive UK rock tours of the 1980s, the hypercardioid's tight 105-degree front pickup angle was a revelation. Sound engineers found these mics were vital for miking closely-packed drum kits and instrument amps on loud stages, reducing sound leakage by up to 50% compared to standard cardioids in high-volume venues like Wembley Arena. The pattern's deep null at 110 degrees was perfectly suited for placing wedge monitors in the UK's often-compact venues. You can read more about the history of specialist polar patterns on Shure's website.
Polar Pattern Characteristics at a Glance
To make selection easier, this table breaks down the core characteristics of each pattern. Understanding these differences helps you anticipate how a microphone will behave before you even plug it in, saving valuable setup time on site.
| Polar Pattern | Pickup Angle | Angle of Maximum Rejection (Nulls) | Rear Lobe Sensitivity | Best For |
|---|---|---|---|---|
| Omnidirectional | 360° | None | N/A (Equal Sensitivity All Round) | Capturing room ambience; interviews with multiple speakers. |
| Cardioid | ~130° | 180° (Directly at the rear) | None | General-purpose live vocals and instrument miking. |
| Supercardioid | ~115° | 125° & 235° | Small rear lobe | Isolating sources on a loud stage with good side rejection. |
| Hypercardioid | ~105° | 110° & 250° | More sensitive rear lobe | Maximum isolation in noisy environments; drum miking; film dialogue. |
| Figure-8 | 90° (Front & Rear) | 90° & 270° (Directly at the sides) | Equal to the front | Stereo recording techniques; rejecting sound from the sides completely. |
Ultimately, choosing between these patterns is a game of trade-offs. The hypercardioid offers the best side rejection of any directional mic, but this comes at the cost of a more sensitive rear lobe. If your main goal is to eliminate sound from the sides—like hi-hat bleed into a snare mic—it is the undisputed champion. However, if there's a significant noise source directly behind the mic, a supercardioid might be a more practical choice.
Winning the Battle Against Feedback in Live Sound
For any live sound engineer, the stage is a battlefield. Your main enemies? Feedback and bleed—unwanted noise that can muddy the mix and completely ruin a performance. In this high-stakes environment, the hypercardioid polar pattern isn't just another technical spec; it's one of your most effective weapons for bringing clarity and control to the chaos.
Imagine a lead vocalist on a booming stage, surrounded by thunderous drums and roaring guitar amps. A standard cardioid mic might struggle here, picking up spill from all those nearby sources. But the hypercardioid, with its exceptionally narrow focus, acts like an acoustic sniper. It zeroes in on the vocalist's voice while aggressively rejecting the racket happening just a few feet away.
This precision is exactly what allows engineers to push vocal levels higher in the mix without triggering that dreaded, high-pitched squeal of feedback. It’s the key to making a singer cut through a dense wall of sound, ensuring every word lands with punch and definition.

Mastering the Null Points for Maximum Gain
The real genius of using a hypercardioid mic live is all about understanding its "nulls"—the points where it rejects sound most effectively. A cardioid mic rejects best from directly behind it, but a hypercardioid's nulls are located at roughly 110 and 250 degrees off-axis. This is a crucial detail when you're placing stage monitors.
By positioning floor monitors so they fire directly into these nulls, you create a dead zone where the microphone is least sensitive. This strategic alignment is the secret to achieving maximum gain before feedback. It means you can give performers the loud, clear monitor mix they need to stay on pitch, without that sound bleeding back into the mic and creating a feedback loop.
This technique flips a potential weakness—the pattern’s rear sensitivity—into a massive strategic advantage. It definitely requires more precision than a simple cardioid setup, but the payoff is a significantly cleaner and louder stage. For complex setups, a modern digital mixer for your audio system gives you the granular control needed to really perfect this kind of mix.
Real-World Scenarios and Applications
So, let's move beyond the theory. The hypercardioid pattern really excels in specific, challenging situations that demand surgical precision.
-
Isolating Drum Kit Elements: Put a hypercardioid mic on a snare drum, and its tight pattern will help reject the hi-hats right next to it. Aim it at a tom, and you'll minimise bleed from the cymbals crashing just above. This separation gives you incredible control when it's time to mix the drum sound.
-
Miking Acoustic Instruments: Trying to capture an acoustic guitar or violin on a loud stage? A hypercardioid can isolate the instrument's delicate sound from louder amps and drums, delivering a far more natural and focused tone to the front-of-house mix.
-
Noisy Stage Environments: In venues with poor acoustics or on stages packed with performers, the hypercardioid's extreme side rejection is invaluable. It helps to keep each microphone channel clean, leading to a clearer, less cluttered sound for the audience.
A seasoned engineer from a well-known London music venue once told a story about a particularly loud rock band. The guitarist’s amp was bleeding into every single mic on stage. By switching the lead vocal mic to a hypercardioid model and carefully angling it away, they eliminated 90% of the guitar bleed, transforming a muddy vocal channel into a clean, powerful lead.
This level of isolation is something you just can't achieve with wider patterns. It empowers engineers to solve common problems creatively, using their microphone choice and placement as the primary tools. While it demands a more careful setup, the hypercardioid's ability to pull a pristine signal from a chaotic source makes it an indispensable tool for any serious live sound professional.
Getting Pristine Isolation in the Studio
While the hypercardioid pattern is a real champion on the live stage, its unique strengths translate beautifully to the controlled environment of a recording studio. Here, the game changes from fighting feedback to capturing the cleanest possible recordings. The secret weapon, though, is still the same: exceptional side rejection.
Imagine trying to track a full band playing live in one room. You've got a vocalist, a guitarist, and a drummer all giving it their all at the same time. If you were to use less directional mics, you’d end up with a serious amount of bleed, where the sound of the guitar amp spills into the vocal mic and the drums crash their way into everything.
This is where a hypercardioid polar pattern microphone really proves its worth. By placing hypercardioid mics on each sound source and positioning them carefully, you can create distinct pockets of isolation. The result? A set of tracks that are far cleaner and much easier to mix, giving you total control over each instrument’s volume, EQ, and effects down the line.
Taming Bleed in Multi-Instrument Setups
The main advantage of a hypercardioid mic in the studio is its knack for shutting out unwanted sound from nearby instruments. Its deep null points at roughly 110 and 250 degrees are incredibly effective at rejecting off-axis noise—much more so than what you'd get from a standard cardioid pattern.
Think about these common studio scenarios:
- Vocalist and Acoustic Guitar: When a singer is also strumming an acoustic guitar, you can angle a hypercardioid mic on their vocals to place the guitar squarely in the mic's side null. This drastically cuts down on how much of the instrument bleeds into the vocal track.
- Drum Overheads: Although often used for close-miking, a pair of hypercardioid mics as overheads can deliver a tighter, more focused image of the cymbals while rejecting more of the room's reflections than wider patterns would.
- Close-Miking Toms: Placing a hypercardioid mic on a tom lets you point the side null directly at the nearby hi-hat or snare. This gives you a punchier, more isolated tom sound with a lot less cymbal wash.
In a professional studio, reducing bleed isn't just about tidiness; it’s about protecting phase coherence. When sound from one source leaks into multiple microphones at slightly different times, it can lead to phase cancellation, leaving you with a thin, weak sound. Hypercardioid mics help prevent this by grabbing a much drier, more direct signal from the instrument you're actually aiming at.
From the Studio to the Film Set
This principle of extreme isolation isn't just for music production—it’s just as crucial in the worlds of film and broadcast. The classic shotgun microphone, an absolute staple for capturing dialogue on set, is fundamentally built on hypercardioid principles.
A shotgun mic uses something called an interference tube to create an even tighter, more directional pickup pattern (often called a lobar pattern). Underneath it all, however, the capsule is typically hypercardioid or supercardioid. This design is what allows a sound recordist to zero in on an actor's voice from a distance while rejecting all the off-camera noise, like crew chatter, passing traffic, or equipment hum. It’s this focused nature that makes clean, intelligible dialogue possible in challenging field recording situations.
Managing the Rear Lobe in a Controlled Space
Just like on a live stage, the hypercardioid’s rear lobe of sensitivity needs careful handling in the studio. In fact, in a well-treated room, reflections can become even more obvious. A common mistake is to place a hypercardioid mic with its back to a hard, reflective surface like a glass window or a bare wall.
This placement can cause sound waves from the source to bounce off the wall and straight into that sensitive rear lobe, creating a coloured, phasey sound that messes up the recording. To avoid this, always make sure the back of the mic is pointing towards an acoustically absorbent surface—a treated wall, a gobo, or even just an open part of the room away from any reflective boundaries. If you mind the back of the mic as much as the front, you can really unlock its full potential for pristine studio tracks.
Mic Placement Techniques and Mistakes to Avoid
Getting the best out of a hypercardioid microphone is less about the mic itself and more about understanding the room it’s in. Because this pattern is so incredibly focused, placement isn't just a suggestion—it's everything. Every single centimetre counts, and mastering this is what separates a muddy, feedback-ridden mix from a professional one.
The real skill is aiming the microphone with surgical precision while constantly being aware of its two blind spots—the nulls—and that sneaky little point of hearing at the very back. Unlike a more forgiving cardioid that picks up a wider area, a hypercardioid demands real intention. Tiny tweaks in angle and distance can make a world of difference.

This section is your field guide for getting it right, breaking down the essential dos and don'ts for installers and engineers.
Managing Proximity Effect and On-Axis Aiming
One of the defining sonic traits of any directional mic is the proximity effect, and with a hypercardioid, it's seriously pronounced. As you get closer to the mic, the low frequencies get a significant boost. This can add warmth and body to a voice, but it can just as easily turn into a boomy, muffled mess if you’re not careful.
This means that consistent distance is absolutely crucial. For a vocalist, even shifting back and forth slightly can change their tone completely. When setting up a mic for a speaker or singer, you need to establish a good working distance and help them stick to it.
You can also use the proximity effect creatively, especially on instruments. Moving a hypercardioid closer to the soundhole of an acoustic guitar or the grille of an amp can add some real weight. But be warned: a few centimetres is all it takes to go from a rich, full tone to an undefined rumble.
Beyond distance, aiming is king. The on-axis response (0 degrees) is where the sound is most natural and clear. The second a source drifts off-axis, you'll start to lose high frequencies, and the sound will become dull.
The Art of Null Point Placement
The true magic of a hypercardioid mic lies in what it doesn't hear. Its points of maximum rejection, or nulls, sit at roughly 110 and 250 degrees. These are your secret weapons for killing bleed from other instruments and stopping feedback in its tracks.
Here's a practical checklist for using the nulls to your advantage:
-
Identify Your Main Noise Source: What's the biggest problem you need to get rid of? Is it a loud floor monitor, a nearby hi-hat, or just general stage noise?
-
Position the Microphone: Place the mic so that the unwanted sound is pointing directly into one of those side nulls. Imagine a straight line from the noise source to the mic—that line should be at a 110-degree angle from the front of the mic.
-
Monitor Placement is Non-Negotiable: When using floor monitors, you absolutely must not place them directly behind the microphone like you would with a cardioid. Instead, position them off to the sides, firing squarely into the nulls. This setup gives you far more volume before feedback becomes an issue.
Nailing this technique is fundamental to using a hypercardioid in a live sound environment. Getting it wrong is the number one reason engineers struggle with feedback when they switch to this pattern.
Avoiding the Pitfalls of the Rear Lobe
While the sides of a hypercardioid are dead, the back is not. That small lobe of sensitivity directly behind the mic (at 180 degrees) is the pattern's Achilles' heel if you ignore it. It will happily pick up whatever it's pointed at, which can cause all sorts of confusing problems.
Here are the most common mistakes to watch out for with the rear lobe:
- Reflective Surfaces: Never point the back of a hypercardioid at a hard, flat surface like a bare wall, a glass window, or a low ceiling. Sound from the front will bounce off that surface and go straight into the rear lobe, causing phase cancellation and a thin, hollow sound.
- Ceiling Reflections: In rooms with low ceilings, this rear lobe can easily pick up reflections from the main PA system. This is a classic cause of that mysterious feedback that seems to appear from nowhere. Tilting the mic down slightly can often solve this by aiming the rear lobe away from the ceiling.
- Unwanted Sound Sources: If you've carefully placed the mic to reject a hi-hat in its side null, make sure you haven't accidentally pointed the rear lobe at the ride cymbal or another instrument. You always need to be aware of what's happening in the full 360-degree space around the mic.
By mastering on-axis aiming, strategically placing your nulls, and always respecting that rear lobe, you can turn the hypercardioid pattern from a tricky tool into a precise and powerful solution for audio isolation.
Common Questions About Hypercardioid Mics
Even when you’ve got the theory down, a specialised tool like a hypercardioid microphone always throws up practical questions. Its unique behaviour can feel a bit odd at first, but figuring out the nuances is exactly what unlocks its power to capture clean, isolated audio. We’ve pulled together the most common questions we hear from engineers and installers to give you clear, straight-to-the-point answers.
Think of this as your field guide for quick troubleshooting. The aim is to get you from knowing what a hypercardioid is to knowing precisely how to use it to solve real-world audio problems, whether that’s on a noisy stage or in a less-than-perfect recording space.
When Should I Choose Hypercardioid Over Supercardioid?
This is the classic dilemma, since both patterns are brilliant at isolation. The choice really boils down to two things: the exact location of the sound you don't want, and where your stage monitors are placed.
A hypercardioid pattern gives you the absolute tightest side rejection. Its null points are deeper and sit at roughly 110 degrees. This makes it the undisputed champion for killing sound bleed from sources directly beside the mic – think a hi-hat cymbal right next to a snare drum.
But that laser-like focus up front comes at a price: a more sensitive rear lobe. A supercardioid, on the other hand, has slightly wider side pickup but its rear lobe is much smaller, with nulls around 125 degrees. If the main source of noise is directly behind the mic, a supercardioid is often the smarter, more forgiving choice.
The real decider is often monitor placement. With a hypercardioid mic, you have to position monitors at that 110-degree angle to hit the dead spots. For a supercardioid, they need to be at 125 degrees. Getting this geometry right is the secret to killing feedback before it starts.
How Does a Hypercardioid Polar Pattern Affect Sound?
Absolutely. The focused design creates some very distinct sonic traits. The most obvious is a powerful proximity effect – bass frequencies build up dramatically as the sound source gets closer. While this can add a lovely warmth and authority to a voice, it demands really consistent mic technique to stop the sound from becoming boomy and muddy.
Another key thing to listen for is its off-axis colouration. Sound that bleeds in from the sides of a hypercardioid can sound more 'coloured' or unnatural compared to the spill on a standard cardioid. That’s an important point to consider when you know some bleed is inevitable; you want that spill to sound as pleasant as possible in the final mix.
Are Hypercardioid Mics Good for Podcasting or Streaming?
They can be an absolutely outstanding choice, especially in untreated rooms. That powerful side rejection is fantastic for minimising room echo, the whir of a computer fan, and other background noise. You get a much cleaner, more professional vocal track right from the source, which is always better than trying to fix a noisy recording with software afterwards.
The trade-off, however, is that they demand consistent technique from the person speaking. You have to stay pointed directly into the front of the microphone. If you move even slightly off-axis, your volume and tone will change noticeably. For energetic presenters who tend to move around, a more forgiving cardioid might be a better, less stressful option. The microphone's connection, like a 3.5 mm jack with a microphone, is far less critical than mastering its directional sweet spot.
What Causes the Rear Pickup Lobe?
That little lobe at the back isn't a design flaw; it's a direct result of the acoustic physics needed to create such a tight forward focus. Directional mics like this work on a pressure-gradient principle, using little ports to let sound hit both the front and back of the diaphragm.
To get the extreme side rejection of a hypercardioid, engineers have to carefully manipulate phase cancellations between the sound waves arriving at the capsule. This clever process, which creates those deep nulls at the sides, naturally results in a small area of constructive interference (and therefore, sensitivity) right at the back. A skilled engineer learns to aim this rear lobe away from anything noisy, turning a potential weakness into a non-issue through smart placement.
At Epic Audio Ltd, we provide AV professionals with the specialised tools and technical support needed to tackle any audio challenge. From high-isolation microphones to complete installation solutions, our portfolio is built to deliver clarity and reliability. Explore our range of pro audio equipment and project services at https://epicaudio.co.uk.