
If you’ve ever wondered why some microphones seem to magically isolate a singer's voice from the rest of the band, you’re about to meet the cardioid polar pattern. In simple terms, it creates a heart-shaped field of sensitivity for the microphone. This means it's brilliant at picking up sound from the front but actively rejects sound coming from the back.
This highly focused directionality is exactly why it’s become the go-to standard across the audio industry for honing in on a specific sound source and pushing background noise into the cheap seats.
Understanding the Heart of Your Microphone
Think about trying to hold a conversation in a loud, crowded room. You instinctively lean in, cupping your ears to focus on the person speaking directly to you, which helps filter out all the surrounding noise. A microphone with a cardioid polar pattern essentially does the same thing, just electronically. It’s been designed from the ground up to "listen" almost exclusively to whatever is right in front of it.
This precise pickup pattern has made it an absolutely essential tool for anyone working with sound. Whether you're miking a live vocalist or capturing an acoustic guitar in the studio, its ability to isolate what you want to hear is invaluable. The key benefits really boil down to this:
- Excellent Sound Isolation: It grabs the sound source you're aiming at while dramatically cutting down on bleed from other instruments or the general ambience of the room.
- Superior Feedback Control: Because it rejects sound from the rear, you can point a cardioid mic away from a stage monitor without causing that ear-splitting squeal of feedback. It’s a lifesaver in live sound.
- Focused Audio Capture: It makes sure the main event—be it a presenter at a lectern, a lead singer, or a solo instrument—stays front and centre in the mix.
This heart-shaped sensitivity pattern became the undisputed champion for live performance and broadcasting in the UK throughout the back half of the 20th century. Its strong frontal pickup and impressive rear rejection give engineers the power to craft a much cleaner, more impactful sound. For a deeper dive into these microphone statistics, you can find more insights on Scoop.
To really get a feel for what makes the cardioid pattern so special, it helps to see how it compares to the other main players in the microphone world.
Let's break down the fundamental differences between the most common polar patterns. This table gives you a quick, at-a-glance overview of where cardioid fits in.
Quick Comparison of Common Microphone Polar Patterns
| Polar Pattern | Sound Pickup Area | Primary Use Case |
|---|---|---|
| Cardioid | Heart-shaped area in front of the mic | Live vocals, instrument miking, podcasting |
| Omnidirectional | Picks up sound equally from all directions | Capturing room ambience, conference tables |
| Figure-8 | Picks up from the front and rear, rejects sides | Stereo recording, interviews with two people |
As you can see, each pattern has a job it’s best suited for. While an omni is great for capturing the whole environment and a figure-8 has its niche uses, the cardioid's focused approach makes it the most versatile and widely used pattern of them all.
How Cardioid Microphones Actually Hear Sound
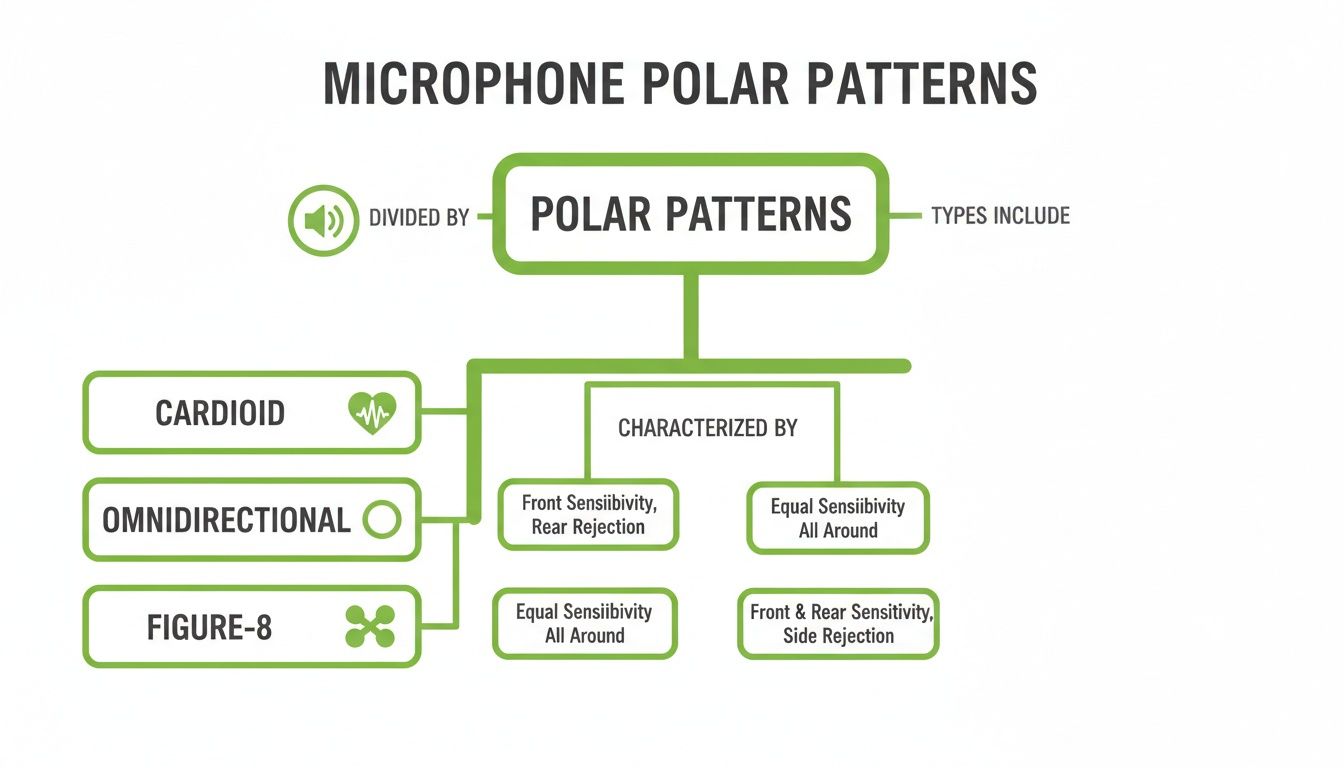
That elegant, heart-shaped sensitivity you see on a cardioid polar pattern isn’t magic; it’s just very clever acoustic engineering. At its core, a cardioid mic gets its directionality by cleverly combining the traits of two other fundamental patterns: omnidirectional and figure-8.
Think of an omnidirectional element as hearing everything equally from all directions—a perfect sphere of sound. Now, picture a figure-8 element, which hears perfectly from the front and back but is essentially deaf to the sides. A cardioid microphone is born when you add the omni element's output to the front-facing lobe of the figure-8 element, while at the same time, using the omni's signal to cancel out the figure-8's rear lobe.
It's this elegant combination that carves out the signature cardioid shape, giving it that strong sensitivity at the front and a dead spot of maximum rejection directly at the back.
The Null Point and Frequency Response
This area of maximum rejection, located at 180 degrees directly behind the microphone, is known as the null point. For any AV integrator, strategically aiming this null point at unwanted sound sources—like stage monitors or a noisy crowd—is the absolute key to getting clean audio and keeping feedback at bay.
But here’s something crucial to remember: a cardioid pattern isn't perfectly consistent across all frequencies. The heart shape tends to get wider and less directional for low frequencies (bass sounds), while it becomes narrower and more focused for the high frequencies (treble). In practice, this means a cardioid mic might pick up more low-frequency room rumble from its sides than you'd expect just by looking at the diagram.
A cardioid pattern is, mathematically speaking, the superposition of an omnidirectional (pressure) and a figure-8 (pressure-gradient) response. This combination also explains why cardioid capsules exhibit that noticeable low-frequency proximity boost when a source gets very close—a phenomenon well-documented in UK studio guides.
This diagram gives you a great side-by-side comparison of the three fundamental polar patterns.
The visualisation clearly shows the cardioid’s front-focused sensitivity compared to the all-encompassing omni and the two-sided figure-8, highlighting why they each have such distinct applications. This foundational knowledge is especially important when dealing with various audio connections, as we detail in our guide on the 3.5mm jack with a microphone.
Choosing the Right Polar Pattern for the Job
While the cardioid polar pattern is an incredibly versatile tool, it isn't always the perfect solution for every single job. Knowing when to stick with a cardioid and when to reach for an omnidirectional or a more focused supercardioid mic is a true mark of a skilled AV professional. The right choice always hinges on the specific application, the room's acoustics, and the outcome you're trying to achieve.
Let’s take a large, polished boardroom table as an example. Placing several cardioid gooseneck mics around it might seem logical at first, but this can quickly turn into an audio minefield. Each microphone would need to be aimed perfectly, and if a participant leans back or moves slightly off-axis, their volume could suddenly dip.
In this situation, a single, high-quality omnidirectional boundary microphone placed in the centre of the table is often a far better solution. It captures everyone around the table with equal clarity, creating a more natural and consistent soundscape without the headache of managing multiple mics and a complex mix.
When to Go Beyond Cardioid
The decision to use a different pattern often comes down to balancing sound isolation against capturing the room's ambience. A standard cardioid offers a great middle ground, but specialised situations call for specialised tools.
A supercardioid or hypercardioid pattern gives you an even tighter pickup angle than a standard cardioid. This is essential when you need maximum isolation—think miking a presenter on a noisy stage or trying to isolate an instrument in a live band. The trade-off is that these patterns have a small lobe of sensitivity directly at the rear, a crucial detail to remember when positioning stage monitors to avoid feedback.
Choosing the right microphone is more than a technical decision; it's a creative one that shapes the entire audio experience. It requires a deep understanding of how each component works together to achieve a flawless result.
To really appreciate why these choices matter so much, it helps to understand the intricacies of event production, where audio fidelity is absolutely paramount. This wider view helps clarify why a subtle change in polar pattern can have such a massive impact on the final mix.
For a quick-reference guide, we've put together a table breaking down the key characteristics of each pattern. It's a handy cheat sheet for AV installers to see which pattern fits best for different professional environments.
Polar Pattern Characteristics for AV Installations
| Pattern Type | Pickup Angle (Degrees) | Max Rejection Point | Best for Feedback Control | Ideal Application |
|---|---|---|---|---|
| Cardioid | ~130° | 180° (Rear) | Very Good | General purpose vocal, instrument, and lectern miking. |
| Supercardioid | ~115° | 126° (Off-axis rear) | Excellent | Isolating sources in loud environments; requires precise monitor placement. |
| Hypercardioid | ~105° | 110° (Off-axis rear) | Maximum | Film sound, situations demanding extreme source isolation. |
| Omnidirectional | 360° | None | Poor | Conference rooms, capturing room ambience, studio ensembles. |
Ultimately, having a clear grasp of these patterns and their real-world behaviour allows you to select the right tool for the job, ensuring clean, intelligible audio every time.
Mastering Cardioid Microphone Effects in the Real World
Understanding a polar pattern on paper is one thing, but mastering its effects out in the field is what separates a good AV integrator from a great one. These microphones interact with their environment in very predictable ways, and knowing how to handle these behaviours is the key to delivering clean, professional audio on every job.
We can boil it all down to three crucial concepts you'll face on almost every installation: off-axis rejection, feedback control, and the proximity effect. Each one presents both challenges and opportunities.
Leveraging Off-Axis Rejection
The most celebrated feature of any cardioid mic is its knack for ignoring sound from the sides and rear. This off-axis rejection is your number one tool for creating sonic isolation in busy or noisy environments.
Picture this: you're setting up a lectern microphone in a lively conference hall. The audience is chatting, and the building's air conditioning is humming away. By pointing the front of the cardioid mic directly at the presenter's mouth, you are also, by default, pointing its dead zones—the sides and rear—at all those unwanted noises.
This simple act of placement cleans up the audio signal dramatically. It ensures the presenter’s voice comes through crisp and clear, not lost in a sea of background mush. The same principle applies when miking up a panel of speakers; careful aiming makes sure each mic is focused squarely on its intended source.
The heart-shaped sensitivity of a cardioid polar pattern isn't just about what it hears; it's just as much about what it is designed to ignore. Strategic placement turns this rejection into your most powerful audio clean-up tool.
Winning the Fight Against Feedback
Feedback is the arch-nemesis of any live sound system. That piercing squeal is what happens when a microphone picks up sound from a speaker, sends it back through the amplifier, and out of the same speaker again, creating a vicious loop. The cardioid pattern is your best defence.
The secret is the microphone's null point—that spot of maximum rejection directly at its rear (180 degrees). To stop feedback in its tracks, you have to position your mics so their null points are aimed squarely at any monitor wedges or PA speakers.
- Stage Monitors: Make sure the back of a vocalist's mic is pointing directly at their floor monitor.
- Ceiling Speakers: For ceiling-mounted mics in a boardroom, orient them so the rear faces the nearest speaker.
- PA Systems: When using a lectern mic, position it so the main PA speakers are behind the microphone.
This simple positioning technique lets you achieve far more volume—or gain before feedback—which gives you the headroom you need for a powerful presentation without things spiralling out of control. Fine-tuning these mic-to-speaker relationships is a crucial skill. For more advanced control, getting to grips with the signal flow on a digital audio mixer is essential.
Controlling the Proximity Effect
Finally, every directional microphone exhibits a behaviour known as the proximity effect. This is a very noticeable boost in low-frequency (bass) response as a sound source gets right up close to the microphone capsule.
This effect can be a creative tool or a real problem. A radio presenter might use it on purpose to get that classic, deep broadcast voice. However, a speaker at a lectern who keeps moving closer and further from the mic will cause their tone to swing from thin and reedy to boomy and muffled.
To manage it, simply advise presenters to keep a consistent distance from the microphone. If the boominess is still an issue, just engage the low-cut or high-pass filter on your mixer. This will gently roll off the excessive bass, restoring a much more natural and balanced vocal tone.
Strategic Placement for Cardioid Microphones

Knowing the theory behind the cardioid polar pattern is one thing, but getting flawless audio in a real-world venue comes down to a single skill: placement. How you position and orient a microphone is every bit as crucial as the model you choose. A perfectly placed cardioid mic delivers pristine clarity; a poorly positioned one will fight you at every turn.
This is your hands-on playbook for getting it right. The core principle couldn't be simpler: point the front of the microphone at what you want to hear, and point the back at what you want to ignore. This simple act maximises the sound you want while using the pattern's powerful rear rejection to kill unwanted noise.
It's an approach that has proven its worth time and again. In fact, UK sales data shows that cardioid models have dominated microphone sales to venues and studios between 2015 and 2024, a trend driven by their sheer effectiveness in both live sound and recording. For a deeper dive into these figures, you can read the full research on the UK microphone market.
Common Scenarios and Best Practices
Different environments call for different placement strategies. Let's break down how to apply cardioid principles in a few common installation scenarios to nail sound isolation and feedback control.
-
Lecterns and Podiums: Position the gooseneck microphone about 15-30 cm from the speaker's mouth, aimed directly at them. The critical part? Make sure the rear of the mic—its null point—is aimed away from any floor monitors or out toward the audience to reject any reflected sound.
-
Handheld Mics for Q&A: Coach users to hold the microphone close to their mouth and speak directly into the top. This doesn't just ensure a strong signal; it also uses the proximity effect to its advantage, giving the voice a full, clear quality while the cardioid pattern rejects ambient crowd noise.
-
Conference Room Tables: When using individual cardioid mics, each one has to be aimed precisely at its designated participant. The rear of each mic should face the room's main PA speakers or any other microphones on the table to minimise bleed and potential phase issues.
Think of strategic placement as creating an invisible cone of sensitivity that captures only the intended source. You're essentially using the microphone's "deaf spot" as a shield against feedback and background noise.
Mounting Choices and Their Impact
The way a microphone is mounted dramatically affects its performance. Every choice offers a different balance of aesthetic appeal, user convenience, and acoustic isolation, and knowing which to choose is a key part of the job.
Ceiling-mounted cardioid mics, for example, are fantastic for keeping a conference table clear, but you have to position them carefully to avoid picking up the drone of HVAC systems or sound from ceiling speakers. You can explore how these choices interact with your wider system in our guide on pairing wireless microphones with speakers.
Stand-mounted microphones offer more flexibility for precise aiming but can be more visually intrusive. The trick is to select the mounting method that best serves the room's acoustics and how it will be used, always coming back to that fundamental rule: aim the front at the source and the rear at the noise. Apply these practical strategies, and you can guarantee the best possible sound in any environment.
Of course, here is the rewritten section with a more natural, human-expert tone, following the provided style guide.
Common Questions About the Cardioid Polar Pattern
Even when you've got your head around the theory, a few common questions always seem to pop up during an install. Getting these sorted can be the difference between a frustrating setup and a flawless audio experience. Let’s tackle some of the most frequent queries head-on.
These are the kind of practical, real-world issues that can trip you up on a job, so having clear answers is key to delivering a professional result.
Can a Cardioid Mic Pick Up Sound from the Back?
It's a common myth that a cardioid mic is completely deaf from behind. While it's brilliant at rejecting sound from the rear, it's not totally silent. The point of maximum rejection—the null point—is directly at the back, at 180 degrees.
However, you'll still get some low-level ambient sound bleeding through, especially with low frequencies which have a nasty habit of wrapping around the microphone's body. Think of it less as a dead zone and more as a zone of extreme quietening. If you need even tighter rejection from the sides, you could step up to a supercardioid, but be warned—they introduce a small sensitive lobe at the very back. It’s a critical trade-off, especially when you're positioning stage monitors.
How Do I Avoid the Proximity Effect?
Ah, the proximity effect. That boomy, unnatural bass boost you get when someone gets right up on the mic is a classic trait of any directional microphone. The simplest fix? Just manage the distance.
- Increase the distance: Moving the mic just a few centimetres away from the source can make a massive difference, bringing back a much more natural, balanced tone.
- Use a high-pass filter: Most professional mixers have a low-cut or high-pass filter (HPF). Flicking this on will gently roll off those excessive low frequencies, clearing up any boominess without thinning out the important vocal range.
This is absolutely crucial for something like a lectern mic, where a presenter might move closer and further away. It keeps their vocal tone consistent and clear.
Remember, the proximity effect isn't always the enemy. While you'll often want to minimise it for clarity, it can be used deliberately by broadcast or podcast pros to add a bit of warmth and authority to their voice.
Are All Cardioid Microphones the Same?
Not a chance. While they all share that same fundamental heart shape, the performance between different models can be night and day. The exact shape of the pattern, how much sound it rejects from the back, and how consistently it behaves across different frequencies can vary massively.
A high-end vocal condenser, for instance, might hold a beautifully consistent cardioid pattern from the deepest lows to the highest highs. On the other hand, a budget dynamic mic might start acting almost omnidirectional at lower frequencies. Always, always check the manufacturer’s spec sheet and polar plots. It’s the only way to truly understand the microphone you’re installing and get predictable, reliable results on site.
For any professional AV installation, from conference rooms to live venues, having the right audio equipment is essential. Epic Audio Ltd provides UK integrators with a complete portfolio of commercial audio solutions, from microphones and mixers to 100V line speakers and Dante-enabled products. We offer free system design and dedicated technical support to ensure your projects succeed. Explore our range of industry-leading brands by visiting us at https://epicaudio.co.uk.